Go ad-free in our community
@glucoseguideapp
Macro and Glucose Tracking, Meal Plans, Label Scanning & Meal Analysis in one place. Download the Diabetes Food Journal App.
Find us on the App Store
@glucoseguideapp
Get the Diabetes Food Journal and Community app on iOS for our Ad-free experience.
Download on Google Play
@glucoseguideapp
Get the Diabetes Food Journal and Community app on Google Play for our Ad-free experience.
b l o g


90-second keto/low carb bread

Go ad-Free with the
glucose guide app

Transform the way you manage diabetes with free tools and support designed just for you from a board certified health coach.

🥐 Carb estimation and analysis tools.
🍳 Cook with Confidence: Meal plans, grocery lists + carb tracking.
💡 Coaching at Your Fingertips: Expert guidance to stay on track
🤝 Join a Thriving Community: Connect with others who get it
💪 Build Your Confidence: Take charge of your health with ease
🚫 No Display Ads 

Feel supported, empowered, and in control.

microwaved bread on a blue plate with the other half of the sandwich behind.
You can make fresh keto and low carb-friendly bread that actually tastes like bread in 90 seconds.

Share

Many of us find it hard to give up bread and our diets.

And it’s difficult. Bread is so good, it smells amazing, and it’s just downright delicious.

Bread is also a relatively inexpensive ingredient, and it’s very easy to find. 

The issue for people like me who are watching our blood sugars is that bread is often too high carb. 

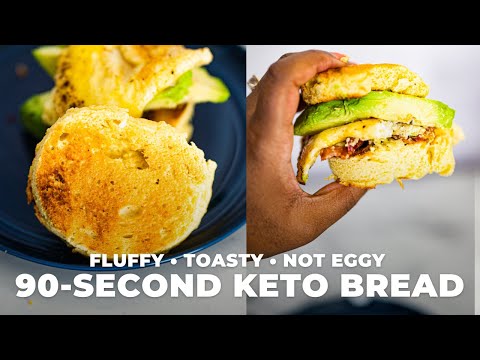
I love this 90-second bread because it’s super simple to make, you can make it in an individual serving, and you can customize it however it fits best for your tastes. 

Ingredients for 90-second keto bread

You’ll need just a few ingredients to make this 90 second bread:

What does 90-second keto bread taste like?

sandwich on 90 second keto bread

I love this recipe because it’s the closest I’ve gotten to actual bread. 

The flavor is nutty, but very mild. It’s able to take on lots of other flavors, making it a good choice for sweet or savory dishes.

As for texture, it comes out of the microwave nice and Squishy. When you toast it in the toaster, it tends to get more firm and develops a toast like crust. 

The problem with most keto bread

There are a few problems with keto and low carb breads that I find.

Oftentimes they look like bread but have no actual flavor. 

Sometimes the texture is just too off, or gritty.  Other times you can really tell that you’re not eating bread at all. Additionally, some low carb breads are way too high in saturated fats, and can send us over our carbohydrate goals.

 The idea with low carb swaps is that your swapping for something that actually taste like the real thing. A lot of Keto breads missed the mark in that regard. But this particular one is really good.

Why do you use almond flour only in this recipe?

If you’re new to the blog you haven’t heard me say this yet, but I hate coconut flour.

 I hate how it tastes, I hate working with it, I hate how dry it makes certain recipes.  Because of that preference, I rarely use coconut flour in a recipe unless I really have no choice.

This recipe is no different. I tried it out first with almond flour only, and it held up perfectly well. 

I decided not to use coconut flour because I believe it would give this recipe and overwhelming coconut taste, which is sometimes too intense. 

It also doesn’t taste like bread. The idea is to make this taste as close to bread as possible.

90-second keto bread is easy

This recipe is so easy that anyone can do it. You add your ingredients to your Ramekin, mix them well, microwave for 90 seconds, slice and enjoy.

There’s no fuss with this recipe, and you can make a few batches at a time if you’d like. 

I like to keep things fresh, and because this recipe is so simple to make, I just make them as I need them.

Can you use a mug to make keto bread?

You can use a mug to make this 90 second keto Bread. what I would caution is that you always use a microwave safe cup or Bowl if you’re making this recipe.

The last thing you want is for your vessel to break inside of your microwave.

If you want Square pieces of bread I would make this recipe in a square shaped dish. 

Otherwise circular dishes like a Ramekin or a mug are perfectly fine as long as you’re fine with them.

What else can I add to my keto bread to make it flavorful?

There are lots of opportunities to add different flavorings. 

I’m a personal fan of garlic powder, and cheddar when I want a savory bread. 

It’s fine as is as a plain option.

Or for a sweet version, you can add things like cinnamon and vanilla to your batter.

I also like a little butter melted on top and spreading some sugar-free jam over the butter.

It’s honestly up to you and your tastes. 

I hope you enjoy this recipe for 90-second keto bread. It’s amazingly easy to make.

Let me know in the comments if you’ve tried it,  and be sure to pin the recipe for later so you can see that in case you want to create it.

Get the recipe for 90-second keto bread

Print
clock clock iconcutlery cutlery iconflag flag iconfolder folder iconinstagram instagram iconpinterest pinterest iconfacebook facebook iconprint print iconsquares squares iconheart heart iconheart solid heart solid icon
microwaved bread on a blue plate with the other half of the sandwich behind.

90-second keto/low carb bread


5 Stars 4 Stars 3 Stars 2 Stars 1 Star

5 from 1 review

  • Author: Mila Clarke Buckley
  • Total Time: 3 minutes, 30 seconds
  • Yield: 1 bread 1x
  • Diet: Gluten Free

Description

You can make fresh keto and low carb-friendly bread that actually tastes like bread in 90 seconds.


Ingredients

Scale
Instacart Get Recipe Ingredients

Instructions

  1. Melt butter in your ramekin (or heat-safe bowl) in the microwave for 30 seconds
  2. Add egg, almond flour, baking powder and salt to the ramekin
  3. Stir thoroughly making sure to get all of the egg, and other ingredients completely mixed. You should have what looks like a batter. 
  4. Microwave for 1 minute and 30 seconds (90 seconds total). 
  5. Use a knife to cut around the outside of the bread and remove it from the container. 
  6. Slice and enjoy in your preferred way. 
90 SECOND keto bread with almond flour | The Hangry Woman

Notes

  • Make sure your bowl is microwave safe for this recipe. 
  • I have not made this with other flours, but I imagine that doing so would mean different ratios for this particular result of fluffy bread and squishy bread.
  • For the ramekin size, I’m using a Le Creuset mini cocotte which is 3 3/4″ diam., 2” high; 8-oz. cap. You may use whatever size you have. A coffee cup also works fine for this. Your bread may be taller and you’ll need to cut it in half. 
  • Prep Time: 2 minutes
  • Cook Time: 1 minute and 30 seconds
  • Category: Bread
  • Method: Microwave
  • Cuisine: Keto

Nutrition

  • Serving Size: 1
  • Calories: 293
  • Sugar: 0.9 g
  • Sodium: 72.6 mg
  • Fat: 20 g
  • Carbohydrates: 4.1 g
  • Fiber: 0.7 g
  • Protein: 9.4 g
  • Cholesterol: 216.5 mg

Other low carb recipes on Hangry Woman

11 Responses

  1. Hello!
    Are you able to use a wider bowl in order to increase the size and would you recommend possibly adjusting the time in the microwave?
    I have all of these ingredients so I am excited to try this! I haven’t found ANY “low-carb” or “low-calorie” breads that haven’t spiked my glucose levels due to some of the “alternative” ingredients.
    Thank you for always sharing wonderful recipes and tips ( :

    1. This is a great question! A few people have tried this, and have had good results. The consensus was that it needed a just slightly lower cook time because it was thinner, You could just 60 seconds, and then 10 second increments from there!

  2. 2 for 1
    You get 2 diabetics who love bread for price of one here😁 and we’re totally fans of the 90 second Keto/LowCarb bread. Have made it so many times and eat it as our light supper w/apple butter l/c or a savory sandwich with ham n cheese. I microwave them and add golden toasted glow from air fryer 4min@370f, split in half and add sweet or savory….yummmm 🤩

    1. I just love how fast it is, and how well it works. Thanks so much for stopping by and leaving a rating!

  3. I have made this before in a ramekin using only almond flour too and it was fantastic. I also used a ramekin and the bread came out the size of an English muffin. The only drawback I have is that it does smell pretty eggy and if you so not add a seasoning in it it’ll taste eggy too. I can get by that but I just wanted to let you know. Btw this is the only bread I use except for low carb wraps.

  4. Hi Mila. Thanks for posting this great recipe – I’m heading for the kitchen to try it right now 🙂 One quick question, if I may – I was interested to see that you bake it in a ramekin. That sounds like a great idea in terms of portion control – but, have you ever tried an actual loaf-sized tin ? Does it rise enough ? Thanks again 🙂 Kind Regards – Chris

    1. Hi Chris!

      I haven’t tried making this a full loaf yet. I think the magic of this one comes from the microwave, and it would take some made science to scale it up into a bigger loaf! I intend to try sometime down the line to see if I can create a loaf that tastes as good as this one, without a crazy long bake time.

    1. I’m using a Le Creuset mini cocotte which is 3 3/4″ diam., 2” high; 8-oz. cap.

      You could also use a coffee cup, or small microwave safe Tupperware if the other options are not available.

      I’ll note this in the notes section. Thanks for asking!

Leave a Reply

Your email address will not be published. Required fields are marked *

Recipe rating 5 Stars 4 Stars 3 Stars 2 Stars 1 Star

Another serving?

Diabetes-Friendly Fluffy Egg White Omelet with Prosciutto and Asparagus

If you’ve ever had an omelet so fluffy it felt like biting into a cloud — you’ll love this one.

This Fluffy Egg White Omelet is proof that simple ingredients can create something totally satisfying. It’s one of my go-to breakfasts when I want to keep things light, protein-rich, and quick (because who has time for a complicated morning?).

If you’re watching saturated fats in your diet, this recipe also allows you the ability to add in fats to your taste.

Egg whites are naturally low in carbs and fat, and when whipped, they create that dreamy, souffle-like texture.

The asparagus adds a crisp, springy bite, and the prosciutto? Salty, savory, and indulgent without going overboard on calories. A sprinkle of Parmesan ties it all together with a hint of nuttiness.

Why This Recipe Works for Blood Sugar Balance

This breakfast balances lean protein and fat, which helps slow digestion and keeps you feeling full longer — meaning less of a blood sugar spike after eating. With just 2 grams of carbs per serving, it’s perfect for anyone watching their glucose levels or easing into a lower-carb morning routine.

Pair it with a side of fresh berries or half an avocado for a little extra fiber and healthy fats — both of which support smoother post-meal glucose curves.

Blood Sugar Benefits by Ingredient

IngredientBenefit for Blood SugarWhy It Matters
Egg whitesPure protein, no carbsHelps stabilize blood sugar and support muscle repair without affecting glucose levels.
ProsciuttoLow in carbs, adds flavorProvides satiating fat and protein, reducing cravings and quick spikes.
AsparagusNon-starchy vegetable rich in fiberSlows digestion, promotes fullness, and may help improve insulin sensitivity.
Parmesan cheeseFat + protein comboSlows carb absorption and adds umami flavor with minimal lactose.
ChivesContains antioxidantsAdds flavor without sodium or sugar, and supports overall inflammation balance.
Olive oil & butterHealthy fatsHelp delay glucose release into the bloodstream and keep you satisfied longer.

Ingredients

  • 2 slices prosciutto (0.7 oz / 20g), torn
  • 2 tsp unsalted butter
  • 3 egg whites
  • ½ tsp chives, finely chopped + extra for garnish
  • 2 tbsp Parmesan cheese, shredded
  • 1 oz (30g) asparagus, thinly sliced

Directions

  1. Heat 1 tsp olive oil in a small nonstick pan. Cook the asparagus until soft, then add prosciutto for 30 seconds. Remove and set aside.
  2. Melt butter in the same pan over low heat.
  3. Whisk egg whites with chives, salt, and pepper until frothy. Pour into the pan. Stir gently for about 10 seconds, then stop.
  4. Cover with a lid and cook for 2–3 minutes until the top looks just set.
  5. Add asparagus, prosciutto, and Parmesan to one side. Fold the omelet over and cook 30 seconds more.
  6. Slide onto a plate, garnish with extra chives, and serve warm.

Nutrition Facts (Per Serving)

EnergyCarbsProteinFat
306 kcal2 g37 g15 g

Recipe Details

Print
clock clock iconcutlery cutlery iconflag flag iconfolder folder iconinstagram instagram iconpinterest pinterest iconfacebook facebook iconprint print iconsquares squares iconheart heart iconheart solid heart solid icon

Diabetes-Friendly Fluffy Egg White Omelet with Prosciutto and Asparagus


5 Stars 4 Stars 3 Stars 2 Stars 1 Star

No reviews

Description

This breakfast balances lean protein and fat, which helps slow digestion and keeps you feeling full longer — meaning less of a blood sugar spike after eating. With just 2 grams of carbs per serving, it’s perfect for anyone watching their glucose levels or easing into a lower-carb morning routine.


Ingredients

Scale

2 slices prosciutto (0.7 oz / 20g), torn

2 tsp unsalted butter

3 egg whites

1/2 tsp chives, finely chopped + extra for garnish

2 tbsp Parmesan cheese, shredded

1 oz (30g) asparagus, thinly sliced

Instacart Get Recipe Ingredients

Instructions

  • Heat 1 tsp olive oil in a small nonstick pan. Cook the asparagus until soft, then add prosciutto for 30 seconds. Remove and set aside.

  • Melt butter in the same pan over low heat.

  • Whisk egg whites with chives, salt, and pepper until frothy. Pour into the pan. Stir gently for about 10 seconds, then stop.

  • Cover with a lid and cook for 2–3 minutes until the top looks just set.

  • Add asparagus, prosciutto, and Parmesan to one side. Fold the omelet over and cook 30 seconds more.


  • Slide onto a plate, garnish with extra chives, and serve warm.

Notes

Pair it with a side of fresh berries or half an avocado for a little extra fiber and healthy fats — both of which support smoother post-meal glucose curves.

  • Prep Time: 5 minutes
  • Cook Time: 5 minutes
  • Category: Breakfast
  • Method: Stovetop
  • Cuisine: American

Nutrition

  • Serving Size:
  • Calories: 306
  • Sugar: 1.3 g
  • Sodium: 1782.2 mg
  • Fat: 15.5 g
  • Saturated Fat: 8.2 g
  • Carbohydrates: 2.2 g
  • Fiber: 0.6 g
  • Protein: 37.6 g
  • Cholesterol: 78.9 mg

More Diabetes-Friendly Recipes

hangry woman coaching call to action image

Diabetes-Friendly Pumpkin Puree

If there’s one ingredient that screams fall vibes louder than pumpkin spice lattes, it’s pumpkin purée.

Grabbing a can from the store is convenient (just double check to make sure it’s pumpkin puree, and not pumpkin pie filling!), making it yourself means you get to control the flavor, texture, and freshness.

Plus, you skip out on any added sugars or preservatives that can sneak into pre-made versions — a win for blood sugar balance!

Pumpkin is naturally rich in fiber, vitamin A, and potassium, all of which support healthy digestion and help your body maintain steady glucose levels.

Research suggests that eating foods high in fiber (like pumpkin!) can improve post-meal blood sugar control by slowing down digestion and glucose absorption.

So whether you’re prepping for a cozy pie, a creamy soup, or a smoothie that tastes like fall in a glass, here’s how to make it from scratch.

Pumpkin Puree on a trivet around fall flavors

Ingredients & Benefits

Ingredients
Pumpkin4 lbs. (1.8 kg), deseeded and halvedNaturally low in carbs and calories, high in beta-carotene and fiber. Helps support stable glucose levels.
Water (for stovetop method)Enough to cover pumpkin chunksKeeps the purée soft without adding calories or fat.

That’s it! No added sugar, no fillers — just pure, wholesome pumpkin goodness.

There are two methods for making your puree. I find them both easy to do, but depending on your kitchen setup, one way may be easier than the other.

Oven Method

  1. Preheat the oven to 400°F (200°C). Line a baking sheet with parchment.
  2. Remove the pumpkin stem. Cut the pumpkin in half and scoop out the seeds and fibers (you can roast the seeds later for a crunchy snack!).
  3. Place the halves flesh-side down on the prepared baking sheet.
  4. Roast for 30–45 minutes, or until a knife slides in easily.
  5. Let cool for about an hour. Scoop out the flesh and blend until smooth.

Stovetop Method

  1. Peel, deseed, and chop the pumpkin into chunks.
  2. Boil in water for 20–25 minutes, until tender.
  3. Drain well and let it cool slightly.
  4. Blend until smooth in a food processor or blender.

Storage Tips

  • Store in an airtight container in the fridge for up to 1 week.
  • Freeze in ½-cup portions for up to 3 months — perfect for smoothies or recipes that call for “just a bit.”

Diabestie Tip

Homemade pumpkin purée has about 7g of carbs per serving with no added sugar, making it a smart and satisfying base for your favorite fall dishes. Pair it with a protein source (like Greek yogurt, nuts, or eggs) to balance your blood sugars even more.

Try It In:

Print
clock clock iconcutlery cutlery iconflag flag iconfolder folder iconinstagram instagram iconpinterest pinterest iconfacebook facebook iconprint print iconsquares squares iconheart heart iconheart solid heart solid icon
Pumpkin Puree on a trivet around fall flavors

Diabetes-Friendly Pumpkin Puree


5 Stars 4 Stars 3 Stars 2 Stars 1 Star

No reviews

Description

Skip the canned stuff! Learn how to make silky-smooth, naturally sweet pumpkin purée right in your own kitchen — perfect for soups, pies, or cozy fall breakfasts. It’s low in carbs, diabetes-friendly, and oh-so-satisfying.


Ingredients

Units Scale
  • 4 lbs pumpkin (deseeded and sliced into smaller chunks)
  • Water – Enough to cover the chunks of pumpkin.
  • Optional – pumpkin spice, or ground black pepper
Instacart Get Recipe Ingredients

Instructions

Oven Method

  1. Preheat the oven to 400°F (200°C). Line a baking sheet with parchment.

  2. Remove the pumpkin stem. Cut the pumpkin in half and scoop out the seeds and fibers (you can roast the seeds later for a crunchy snack!).

  3. Place the halves flesh-side down on the prepared baking sheet.

  4. Roast for 30–45 minutes, or until a knife slides in easily.

  5. Let cool for about an hour. Scoop out the flesh and blend until smooth.

Stovetop Method

  1. Peel, deseed, and chop the pumpkin into chunks.

  2. Boil in water for 20–25 minutes, until tender.

  3. Drain well and let it cool slightly.

  4. Blend until smooth in a food processor or blender.

Notes

Store in an airtight container in the fridge for up to 1 week.

Freeze in ½-cup portions for up to 3 months.

Save and roast the seeds for a delicious snack.

  • Prep Time: 10 minutes
  • Cook Time: 40 minutes
  • Category: Basics, Meal Prep
  • Method: Oven or Stovetop
  • Cuisine: American

Nutrition

  • Serving Size: 1/4 cup
  • Calories: 39
  • Sugar: 3.7 g
  • Sodium: 5.7 mg
  • Fat: 0.3 g
  • Saturated Fat: 0.2 g
  • Carbohydrates: 9.2 g
  • Fiber: 3.3 g
  • Protein: 1.2 g
  • Cholesterol: 0 mg

Diabetes-Friendly Make-Ahead Egg, Spinach & Feta Wraps

🥗 Why This Recipe works as a great diabetes-friendly breakfast

This breakfast wrap balances protein, fiber, and healthy fats — a trio that helps slow digestion and prevent blood sugar spikes after eating. Each ingredient plays a special role in making this both delicious and diabetes-friendly:

  • Eggs: Provide high-quality protein and essential fats that help keep you full and stabilize blood glucose. Eggs are also rich in choline, which supports brain and liver health.
  • Spinach: Low in carbs but high in fiber, magnesium, and antioxidants that can improve insulin sensitivity and reduce oxidative stress.
  • Feta cheese: Adds creaminess and tang while delivering protein and calcium — both great for satiety. The saltiness also balances the sweetness of the onions and tomatoes.
  • Sun-dried tomatoes: Offer a burst of umami flavor and antioxidants like lycopene, which may support heart health. Using the oil from the jar infuses flavor without needing extra butter or added fats.
  • Onions: Bring a gentle natural sweetness when caramelized — no added sugar needed — and contain prebiotic fibers that nourish gut health.
  • Cream cheese: Helps bind the wrap together and adds richness, making the meal more satisfying. Choose a light version if you’re watching fat intake.
  • Whole grain or low-carb tortillas: These add gentle, complex carbs for energy while providing fiber to slow digestion. If you want fewer carbs, go for a low-carb or high-fiber wrap.

Together, these ingredients create a flavorful, balanced meal that hits the Goldilocks zone for energy — not too high, not too low.

If you want to add this to your meal plan, be sure to visit heygigi.app to

How to Make It

  1. Preheat the oven to 375°F (190°C). Lightly grease a baking dish with ½ tsp oil and line with parchment paper, leaving some overhang. Spray the parchment with another ½ tsp oil.
  2. Cook the veggies: In a large pan, heat the sun-dried tomato oil over medium heat. Add onion and cook 8–10 minutes until golden. Stir in sun-dried tomatoes, then spinach. Cook just until wilted. Season with salt and pepper.
  3. Mix the eggs: In a large bowl, whisk eggs with 1 tsp salt and ¼ tsp pepper. Stir in the spinach mixture. Pour into your baking dish, top with crumbled feta, and bake 10–15 minutes until set.
  4. Assemble the wraps: Let the egg bake cool for 2 minutes. Lift it out and cut into 5 equal pieces. Spread cream cheese on each tortilla, add an egg slice near the bottom, fold in the sides, and roll up tightly.
  5. Toast: Heat a clean pan over medium heat. Place the wrap seam-side down and cook 3–4 minutes per side until golden. You can also air-fry these.

Storage Tips For These Wraps

Wrap individually in foil or parchment.

  • Refrigerate: Up to 3 days.
  • Freeze: Up to 3 months.
  • Reheat: Microwave for 1–2 minutes, or warm in a skillet or 350°F oven until heated through, or air fry for 10 minutes at 350ºF

💡 Diabestie Tip

If you’re using these as part of your morning routine, pair your wrap with a side of berries for extra fiber and antioxidants. You’ll get a gentle boost of natural sweetness — no blood sugar rollercoaster required

Print
clock clock iconcutlery cutlery iconflag flag iconfolder folder iconinstagram instagram iconpinterest pinterest iconfacebook facebook iconprint print iconsquares squares iconheart heart iconheart solid heart solid icon

Diabetes-Friendly Make-Ahead Egg, Spinach & Feta Wraps


5 Stars 4 Stars 3 Stars 2 Stars 1 Star

No reviews

Description

Packed with protein, fiber, and flavor, they’ll help you start your day with stable blood sugars and steady energy. Plus, they freeze beautifully — perfect for busy mornings when “homemade” feels impossible.


Ingredients

Units Scale
  • 1/4 cup sun-dried tomatoes, chopped
  • 1 tbsp. oil from sun-dried tomatoes
  • 1 onion, chopped
  • 5 oz. (140g) baby spinach
  • 10 eggs
  • 3 oz. (90g) feta cheese, crumbled
  • 5 tortillas (whole grain or low-carb recommended)
  • 4 tbsp. cream cheese
Instacart Get Recipe Ingredients

Instructions

  • Prep & Preheat:
    Heat the oven to 375°F (190°C). Lightly grease a baking dish with ½ tsp oil. Line with parchment, leaving overhang. Spray with another ½ tsp oil.

  • Sauté Veggies:
    In a large pan, heat the sun-dried tomato oil over medium heat. Add onion and cook 8–10 minutes until golden. Add sun-dried tomatoes and cook for 2 minutes. Stir in spinach and cook until just wilted. Season with salt and pepper.

  • Bake the Eggs:
    In a large bowl, whisk eggs with 1 tsp salt and ¼ tsp pepper. Stir in spinach mixture. Pour into the prepared baking dish and sprinkle feta on top. Bake for 10–15 minutes, or until just set. Let cool slightly.

  • Assemble Wraps:
    Lift the baked eggs from the dish and cut into 5 equal pieces. Spread 1 tbsp cream cheese on each tortilla. Place one egg slice near the bottom, fold in sides, and roll tightly.


  • Toast the Wraps:
    Heat a clean pan over medium heat. Cook seam-side down for 3–4 minutes per side until golden and crisp.

  • Prep Time: 10 minutes
  • Cook Time: 20 Minutes
  • Category: Breakfast
  • Method: Stovetop

Nutrition

  • Serving Size: 1 wrap
  • Calories: 335
  • Sugar: 3.4 g
  • Sodium: 371.2 mg
  • Fat: 20.9 g
  • Saturated Fat: 8.6 g
  • Carbohydrates: 19 g
  • Fiber: 3 g
  • Protein: 18.5 g
  • Cholesterol: 398.9 mg

How Glucose Guide’s 18 million item food search database helps you pick better bites and carb count accurately.

At Glucose Guide, our goal is simple: help you understand how different foods affect your blood sugar, and show you the healthy swaps that can make a real difference.

We’re not just tracking calories here—we’re building a tool that helps you connect the dots between what’s on your plate and what happens in your body.

With over 18 million foods (everything from grocery brands to restaurant favorites), our database makes logging smarter, faster, and more useful for daily diabetes management.

a collage of different foods in stacked polaroid fashion

The Importance of Logging Accuracy

When it comes to food logging, accuracy matters—but perfection isn’t the finish line.

Tracking your food helps you understand carbs, protein, fiber, and fat (all of which influence blood sugar), but you don’t need to log every crumb or obsess over flawless entries to see progress.

Consistency is where the magic happens.

Even partial logs give you valuable insights—like which snacks send your glucose on a rollercoaster or which meals keep things steady.

📊 Fun fact: Users who log at least four days in their first week are more likely to show progress toward their health goals than those who don’t. So, do your best, stay consistent, and let go of the pressure to be perfect.

And when accuracy is your priority, Glucose Guide’s barcode scanner, smart search, and (coming soon) voice logging make the process faster and less stressful.

Common Challenges (and How to Beat Them)

If you’ve ever felt unsure about portion sizes or found two wildly different entries for the same food, you’re not alone. Here are some common challenges—and ways to outsmart them:

  • Portion guesswork: A giant burrito might look like “one serving,” but nutritionally, it could be closer to two, or even three.
  • Plate illusions: Bigger plates make portions look smaller, while smaller plates exaggerate size.
  • Food variability: “Chicken salad” at one café isn’t the same as “chicken salad” at another.
  • Crowd-sourced entries: Even in an 18-million-food database, human submissions can vary.

👉 Tips for tackling this:

  • Use a scale or measuring cups occasionally to “train your eyes.”
  • Learn the go-to visuals for your staples (what one tablespoon of peanut butter actually looks like).
  • Check packaging and restaurant nutrition info when available.
  • Remember: awareness is more important than perfection.

Where All Those Foods Come From

Think of our database like a giant food library—except instead of dusty encyclopedias, you’ll find nutrition info that directly supports your blood sugar goals. We build it with:

  • Official sources: Verified nutrition databases and food labels.
  • Restaurants & brands: Everything from chain menus to grocery staples.
  • Community submissions: Add your favorites—we review for accuracy.
  • Quality control: Tech + human review keep things clean and trustworthy.

Tools That Make Food Logging and Carb Counting a Breeze

Logging should feel quick and helpful, not like homework. Here’s how we make it simple:

  • Barcode Scanner: Point, scan, done.
  • Smart Search: Find foods by brand, restaurant, or keywords (“low-carb wrap” vs. “white bread”).
  • Custom Recipes: Save your homemade meals so you can log them again without extra work.
  • Future tools: We’re working toward AI meal recognition and predictive swaps—because logging should be as easy as snapping a photo.

Why This Matters for Your Blood Sugar

Food databases aren’t just about numbers—they’re about insight. With consistent logging, you’ll start to see:

  • Patterns: Which foods cause spikes, which ones keep you stable.
  • Smart swaps: Replace a 45g carb sandwich roll with a 30g wrap and watch the difference in your glucose line.
  • Confidence: Instead of guessing, you’re making choices based on real data and your unique response.

Tips for Getting the Most Out of the Glucose Guide Database

  1. Be specific in searches. “Starbucks Iced Latte Tall” beats “latte” every time.
  2. Use the barcode scanner. Fast + accurate.
  3. Check nutrition info. If a cookie shows “2g carbs,” you know something’s off—flag it.
  4. Log consistently. Even if you don’t log every meal, steady effort reveals patterns.
  5. Explore alternatives. If your fave burger spikes you, check for a bunless or lower-carb option.

The Future of Food Tracking and Carb Counting with Diabetes

We don’t just want to help you track—we want to help you predict and plan. That’s why we’re building toward:

  • Personalized swaps: Learn from your past logs and get smarter suggestions.
  • Glucose insights: Discover how your unique body responds to foods, not just what the label says.

Because your app shouldn’t just keep up—it should help you stay one step ahead.

Glucose Guide’s Diabetes Food Journal gives you tools to learn, experiment, and thrive with diabetes. Every log is another clue in your personal blood sugar story, helping you build habits that feel good and actually work.

Your blood sugar deserves accuracy, flexibility, and maybe even a little fun—and that’s what we’re here for.

👉 Try it today: Explore the database, log your next meal, and see how your choices stack up. And if you’re ready for more, upgrade to premium for custom meal plans, smarter swaps, and deeper insights designed just for you

Crispy Parmesan Eggs: A Low-Carb, High-Protein Diabetes-Friendly Breakfast

If you’ve been around here long enough, you know I love a breakfast recipe that’s quick, comforting, and won’t send my blood sugar on a rollercoaster. These Crispy Parmesan Eggs check all the boxes.

With just three ingredients—Parmesan, eggs, and olive oil—you can whip this up in under 10 minutes.

The best part? The crispy, golden edges of cheese that make it taste almost indulgent while still being friendly to blood sugar balance.

Why I Love This Recipe for Diabetes-Friendly Eating

I’ll be honest: mornings can be chaotic.

Between juggling blood sugars, meds, and just getting everyone out the door, I need something that fuels me without fuss.

Here’s why this recipe works so well: high in protein (26 grams) to help me stay full and keep blood sugars steadier, just 1 gram of carbs per serving so I don’t see big spikes, healthy fats from eggs and olive oil for richness and satiety, and big flavor with minimal effort.

The Parmesan gets golden and crispy and chewy, almost like the edge of a grilled cheese sandwich—need I say more?

Crispy Parmesan Eggs Recipe

Nutrition per serving

  • Calories: 351
  • Carbohydrates: 1 g
  • Protein: 26 g
  • Fat: 27 g

Ingredients (Serves 1, Ready in 10 minutes)

Instructions

  1. Brush olive oil over the bottom of a 10-inch nonstick or cast-iron skillet. Heat on medium.
  2. Evenly sprinkle 2 tablespoons of Parmesan over the base. Cook for about 2 minutes, until the cheese starts to melt.
  3. Crack the eggs on top, cover, and cook for 2–3 minutes until the whites are starting to set.
  4. Uncover, turn the heat to medium-high, and cook for another 1–2 minutes until the edges are crisp. (Careful not to over-brown the cheese—crispy is good, burnt is not!)
  5. Season with salt and pepper. Sprinkle with the last tablespoon of Parmesan before serving.

Tips and Serving Ideas

  • Add avocado slices on the side for extra healthy fats.
  • Pair with a small green salad or sautéed spinach for more fiber.
  • Want a little crunch? Try one slice of whole-grain toast to round out the meal.
  • If you want to do this with fewer eggs, you’re more than welcome to scale the recipe down.
  • If you’re more of a brunch person, this recipe also scales well—just make a bigger batch in a larger skillet, and your guests will love you forever.

More Low-Carb Breakfast Recipes You’ll Love

If you enjoyed this, check out a few more ideas from the blog: Zucchini Frittata, Leek & Bacon Quiche, Resistant Starch Chicken Porridge.

Final Thoughts

This recipe is proof that simple ingredients can make a big impact—on flavor and on blood sugar management. Whether you’re managing diabetes, looking for high-protein meals, or just want something delicious in under 10 minutes, Crispy Parmesan Eggs are a win.

Print
clock clock iconcutlery cutlery iconflag flag iconfolder folder iconinstagram instagram iconpinterest pinterest iconfacebook facebook iconprint print iconsquares squares iconheart heart iconheart solid heart solid icon
parmesan eggs on a plate

Crispy Parmesan Eggs: A Low-Carb, High-Protein Diabetes-Friendly Breakfast


5 Stars 4 Stars 3 Stars 2 Stars 1 Star

No reviews

Description

This recipe is proof that simple ingredients can make a big impact—on flavor and on blood sugar management. Whether you’re managing diabetes, looking for high-protein meals, or just want something delicious in under 10 minutes, Crispy Parmesan Eggs are a win.


Ingredients

Scale

1 tsp olive oil

3 tbsp Parmesan cheese, coarsely grated

3 eggs

Salt and black pepper, to taste

Instacart Get Recipe Ingredients

Instructions

  1. Brush olive oil over the bottom of a 10-inch nonstick or cast-iron skillet. Heat on medium.

  2. Evenly sprinkle 2 tablespoons of Parmesan over the base. Cook for about 2 minutes, until the cheese starts to melt.

  3. Crack the eggs on top, cover, and cook for 2–3 minutes until the whites are starting to set.

  4. Uncover, turn the heat to medium-high, and cook for another 1–2 minutes until the edges are crisp. (Careful not to over-brown the cheese—crispy is good, burnt is not!)

  5. Season with salt and pepper. Sprinkle with the last tablespoon of Parmesan before serving.

Notes

  • Add avocado slices on the side for extra healthy fats.
  • Pair with a small green salad or sautéed spinach for more fiber.
  • Want a little crunch? Try one slice of whole-grain toast to round out the meal.
  • Add a little hot sauce or salsa for good kick.
  • Prep Time: 2 minutes
  • Cook Time: 8 minutes
  • Category: Breakfast
  • Method: Stovetop
  • Cuisine: American

Nutrition

  • Serving Size:
  • Calories: 317
  • Sugar: 0.7 g
  • Sodium: 2827.4 mg
  • Fat: 23 g
  • Saturated Fat: 8 g
  • Carbohydrates: 1.6 g
  • Fiber: 0 g
  • Protein: 24.5 g
  • Cholesterol: 568.8 mg

💌 If you make this recipe, tag me @thehangrywoman on Instagram—I’d love to see your crispy creations!

🥒 Diabetes-Friendly Zucchini Frittata (Low Carb, High Protein)

A fiber-rich, blood sugar-friendly dinner that’s as nourishing as it is delicious—this Zucchini Frittata is perfect for anyone managing diabetes or looking to stabilize their energy throughout the day.

When I think about the kinds of meals that keep me feeling full, satisfied, and balanced, a frittata almost always comes to mind. It’s quick, it’s flexible, and it checks all the boxes for blood sugar–friendly eating: protein, fiber, and healthy fats.

This zucchini frittata is one of those recipes that proves simple doesn’t mean boring. With just a few ingredients—zucchini, eggs, a little cheese, and shallots—you get a dish that’s rich in protein, light on carbs, and full of flavor. It makes an easy breakfast, a quick lunch, or even a light dinner paired with a side salad.

Finished Frittata on a table with a white background. Bowls of cheese, greek yogurt and zucchini surrounding.

Why I Recommend This Zucchini Recipe for People With Diabetes

As a nutritionist living with diabetes, I always look at food in terms of balance—not restriction. Here’s why this recipe works well:

  • Zucchini adds volume and fiber without much carbohydrate, which helps prevent big spikes in blood sugar.
  • Eggs bring protein and healthy fats, which slow digestion and keep you fuller longer.
  • Cheddar cheese adds protein and calcium, while also making the dish more satisfying.
  • Olive oil contributes heart-healthy fats that support satiety and steady energy.

When you pair these ingredients together, you get a nutrient-dense meal that feels comforting and indulgent while still being aligned with diabetes-friendly eating patterns.

If you’re curious about how different foods can impact your blood sugar, you might also enjoy my post on pairing carbs with protein and fiber—it breaks down exactly why this kind of balance works.

Nutrition Per Serving

  • Calories: 367 kcal
  • Carbohydrates: 9 g
  • Protein: 22 g
  • Fat: 27 g

Serves 3 | Total Time: 45 minutes | Gluten-Free | Low-Carb | High-Protein

Ingredients

  • 2 medium zucchinis, coarsely grated
  • 1 shallot, diced
  • 6 large eggs
  • 3.4 fl oz (100 ml) whole milk
  • 2.8 oz (80 g) cheddar cheese, grated
  • 1 tbsp olive oil, divided (½ tbsp for pan, ½ tbsp for baking dish)
  • Salt and black pepper, to taste

Optional for serving: Greek yogurt and fresh chives

Instructions

  1. Prepare the zucchini
    Wash and coarsely grate the zucchini. Place it in a mesh sieve, sprinkle lightly with salt, and let sit for 10 minutes. This helps draw out excess water so your frittata isn’t soggy. Use your hands or a clean towel to squeeze out as much liquid as possible.
  2. Cook the vegetables
    Preheat your oven to 340°F (170°C). Heat ½ tbsp olive oil in a pan over medium heat. Add the shallot and cook until softened, about 3 minutes. Add the zucchini and sauté for another 6 minutes.
  3. Mix the eggs
    In a large bowl, whisk the eggs and milk. Season with salt and pepper. Stir in the cheese and cooked zucchini mixture.
  4. Bake the frittata
    Brush a baking dish or casserole pan with the remaining olive oil. Pour in the egg mixture and bake for 25–30 minutes, or until the center is set and the top is lightly golden.
  5. Serve
    Slice and serve warm. For a little extra protein and creaminess, add a spoonful of Greek yogurt and sprinkle with fresh chives.

Tips From My Kitchen

  • Make it your own: You can easily swap cheddar for mozzarella, feta, or goat cheese.
  • Add more protein: Crumbled turkey sausage, bacon, or smoked salmon work beautifully here.
  • Storage: Refrigerate leftovers in an airtight container for up to 3 days. Warm gently before serving.
  • Pairing suggestion: I love this with a leafy side salad or roasted veggies for an easy, balanced dinner.

If you’re looking for more meal prep inspiration explore my guide on making a healthy diabetes meal plan.

Final Thoughts

Meals like this zucchini frittata remind me that eating with diabetes doesn’t mean giving up comfort food—it means leaning into meals that satisfy both your taste buds and your body. With its balance of protein, healthy fats, and fiber, this recipe is a simple way to nourish yourself while keeping blood sugars steady.

👉 If you’re looking for another variation, check out my Zucchini Tomato Frittata recipe.

For more quick weeknight dinners, you might also like my diabetes-friendly chili recipe.

💡 Tips for Blood Sugar Success

  • Salt and drain your zucchini before cooking to prevent excess moisture and sogginess.
  • Use full-fat dairy for better blood sugar control and satiety.
  • Store leftovers in an airtight container and enjoy within 3 days for a ready-to-go, balanced meal.

❓ FAQs for this Zucchini Frittata

Can I make this dairy-free?

Yes! Substitute the milk with unsweetened almond or soy milk, and omit the cheese or use a plant-based alternative.

Is this keto-friendly?

Absolutely. With only 9g of carbs per serving and high protein/fat content, this fits into most keto meal plans.

Can I freeze the frittata?

Yes, freeze individual slices in airtight containers for up to one month. Reheat in the oven or microwave before serving.

Print
clock clock iconcutlery cutlery iconflag flag iconfolder folder iconinstagram instagram iconpinterest pinterest iconfacebook facebook iconprint print iconsquares squares iconheart heart iconheart solid heart solid icon

🥒 Zucchini Frittata (Low Carb, High Protein)


5 Stars 4 Stars 3 Stars 2 Stars 1 Star

No reviews

Description

This zucchini frittata is one of those recipes that proves simple doesn’t mean boring. With just a few ingredients—zucchini, eggs, a little cheese, and shallots—you get a dish that’s rich in protein, light on carbs, and full of flavor. It makes an easy breakfast, a quick lunch, or even a light dinner paired with a side salad.


Ingredients

Units Scale
  • 2 medium zucchinis, coarsely grated
  • 1 shallot, diced
  • 6 large eggs
  • 3.4 fl oz (100 ml) whole milk
  • 2.8 oz (80g) cheddar cheese, grated
  • 1 tbsp olive oil, divided (1/2 tbsp for pan, 1/2 tbsp for baking dish)
  • Salt and black pepper, to taste
  • Optional for serving: Greek yogurt and fresh chives
Instacart Get Recipe Ingredients

Instructions

  1. Prepare the zucchini. Wash and coarsely grate the zucchini. Place it in a mesh sieve, sprinkle lightly with salt, and let sit for 10 minutes. This helps draw out excess water so your frittata isn’t soggy. Use your hands or a clean towel to squeeze out as much liquid as possible.
  2. Cook the vegetables Preheat your oven to 340°F (170°C). Heat ½ tbsp olive oil in a pan over medium heat. Add the shallot and cook until softened, about 3 minutes. Add the zucchini and sauté for another 6 minutes.
  3. Mix the eggs In a large bowl, whisk the eggs and milk. Season with salt and pepper. Stir in the cheese and cooked zucchini mixture.
  4. Bake the frittata Brush a baking dish or casserole pan with the remaining olive oil. Pour in the egg mixture and bake for 25–30 minutes, or until the center is set and the top is lightly golden.
  5. Serve Slice and serve warm. For a little extra protein and creaminess, add a spoonful of Greek yogurt and sprinkle with fresh chives.
Zucchini Frittata will have you fed for DAYS! #diabetesdiet #diabetesbreakfast #shorts #breakfast

Notes

  • Make it your own: You can easily swap cheddar for mozzarella, feta, or goat cheese.
  • Add more protein: Crumbled turkey sausage, bacon, or smoked salmon work beautifully here.
  • Storage: Refrigerate leftovers in an airtight container for up to 3 days. Warm gently before serving.
  • Pairing suggestion: I love this with a leafy side salad or roasted veggies for an easy, balanced dinner.
  • Prep Time: 10
  • Cook Time: 30
  • Category: Breakfast
  • Method: Baking
  • Cuisine: American

Nutrition

  • Serving Size: 1/6th frittata
  • Calories: 152
  • Sugar: 1.2 g
  • Sodium: 557.8 mg
  • Fat: 11.5 g
  • Saturated Fat: 4.4 g
  • Carbohydrates: 2 g
  • Fiber: 0.1 g
  • Protein: 10 g
  • Cholesterol: 199.4 mg

About Mila

Hi! I'm Mila.

I’m a board certified health and wellness coach and a public health nutritionist with a Master’s degree in Applied nutrition.

I live with  LADA (Latent Autoimmune Diabetes in Adults, a slow-progressing form of autoimmune Type 1 diabetes) I love food, travel, and my kitchen, and teaching you about diabetes self-management.

I’m here to help you live your best life possible diabetes by showing you how to create simple, blood-sugar friendly and delicious meals and tips on diabetes self-care.

Be sure to download my FREE Diabetes Community App Glucose Guide, or reach out for FREE 1:1 diabetes health and habit coaching.

Picture of Mila Clarke, MS, NBC-HWC

Mila Clarke, MS, NBC-HWC

Mila Clarke is a Board Certified Health and Wellness Coach, an author, self-taught cook, nutritionist and Integrative Nutrition Diabetes Health Coach, diabetes advocate and founder of Hangry Woman and The Glucose Guide App. Hangry Woman aims to take away the shame and stigma that comes with a diabetes diagnosis and covers topics like diabetes management, cooking, and self-care from the perspective of someone living with the chronic condition. Her book –– The Diabetes Food Journal –– Is one of the most sought after diabetes self-management tools for patients. Her online community – Glucose Guide – offers affordable health coaching, hundreds of diabetes-friendly recipes and community peer support. Mila has been featured by CNN, The New York Times, Eat This Not That, USA Today, Good Housekeeping and WebMD. She contributes to Healthline, The Washington Post, DiaTribe, and EatingWell Magazine. Mila lives in Houston, Texas with her Miniature Poodle, Noodle.

Before you go…

join my free community.

Ad-free recipes, bookmark your favorites, free live learning events, get special deals and discounts on Nutrition Assistant, and free coaching opportunities. Why not?

Healthy, tasty foods!

Sign up for good-for-you recipes!

Secured By miniOrange